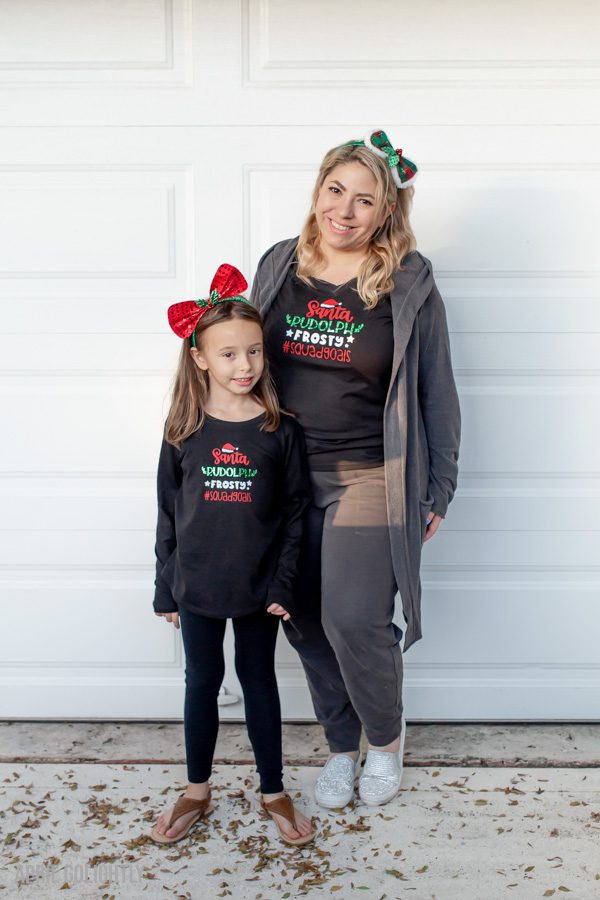
I know that people normally buy Christmas PJs and Christmas dresses, but what about holiday play dates and days at the park during Christmas break? You can make Christmas Shirts for Family so that you can match during the holiday season.

Before I got my Cricut, I used to buy custom shirts from my friend. Now that I have my own Cricut, I love making custom shirts for every holiday and event. It is super easy to customize designs and color in Cricut Design Space.
Christmas Shirts For Family
This original design had brown for Rudolf, but I don’t have brown vinyl nor am I interested in putting brown vinyl on my shirts. Instead I changed the colors to fit what I had on hand. I think the colors look fantastic together.

Measure Shirt First
Take the shirt and measure the space to determine how large you want the words to be. I always keep a small measuring tape in my Cricut.
Cricut Design Space
Open the Cricut Design Space on your computer. You can do this from your phone and tablet too. Add a text box to a new project or you can choose an image design like we did for these shirts. There are some of the awesome pre-made Christmas designs that go great on holiday shirts. Actually, there are ton of free one too. Size the Cricut Design based on the measurements you took of the shirts . You can merge or change the colors of the Design using color sync on the right side of Cricut Design Space. Now, hit MAKE it in green in the upper right corner.
Ironing On BOTH Sparkle Vinyl & Everyday Vinyl
To use Cricut Holographic Sparkle iron on vinyl, you should use the green circuit sheet with the standard stickiness.


Place the Holographic Sparkle vinyl shiny side down on the green standard grip Cricut mat. Make sure it is secure and try to avoid bubbles.
Load the green sheet with the sparkle holographic vinyl on it using the arrows and make sure the Cricut pulls it in properly.
On the computer, choose the machine and make sure that you are reversing the image.
Also, choose the type of Cricut Sparkle Holographic iron-on vinyl by selecting from the Cricut database of material. There are so many – make sure you get the right one.
Ensure that the Cricut has space behind and in front so it can work properly.
When the C – Cricut symbol is flashing, press it and watch the Cricut cut the letters.
Remove the sheet with the arrows.
Pull off the Vinyl and cut the space where the letters are.
Remove everything except the letters from the sheet using the weeding tools.
How to Print Using Cricut Everyday Iron On Vinyl?
To use Cricut Everyday iron on vinyl, you should use the green circuit sheet with the standard stickiness.
Place the Everyday vinyl shiny side down on the green standard grip Cricut mat. Make sure it is secure and try to avoid bubbles.
Load the green sheet with the Everyday vinyl on it using the arrows and make sure the Cricut pulls it in properly.
On the computer, choose the machine and make sure that you are reversing the image.
Also, choose the type of Cricut Everyday iron-on vinyl by selecting from the Cricut database of material. There are so many – make sure you get the right one.
Ensure that the Cricut has space behind and in front so it can work properly.
When the C – Cricut symbol is flashing, press it and watch the Cricut cut the letters.
Remove the sheet with the arrows.
Pull off the Everyday Vinyl and cut the space where the letters are.
Remove everything except the letters from the sheet using the weeding tools.
Pressing Cricut Sparkle Holographic Iron On AND Cricut Everyday Vinyl
Start pressing the Cricut Sparkle Holographic Iron On Vinyl first since the Easy Press 2 needs to be hotter for it to adhere. You don’t want to burn the Everyday Vinyl. You will lower the temperature when you use the Everyday Iron-On Vinyl.
Turn on the Cricut Easy Press 2 and make sure the timer is set to 30 seconds for 330 degrees F for Holographic Sparkle Vinyl.
Lay the shirt bag on the Easy Press Mat on top of a flat surface like a table.
Let the Easy Press 2 heat up while you prep the shirt.Heat up the area for 5 seconds where you will adding the Design. Place the whole design to get the spacing.
Remove all the Everyday Vinyl pieces and leave only the Cricut Sparkle Holographic Iron On.Place the Easy Press 2 on top of the Holographic Vinyl and let it is sit while you hold the machine for 30 seconds.
Remove the Easy Press 2 and put it back on the cradle.
Now, cool down the Cricut Easy Press 2 to 315 degrees F. Add the Everyday Vinyl designs and place the Easy Press 2 on top of the Everyday Vinyl and let it is sit while you hold the machine for 30 seconds.
I know that people normally buy Christmas PJs and Christmas dresses, but what about holiday play dates and days at the park during Christmas break? You can make Christmas Shirts for Family so that you can match during the holiday season.
Before I got my Cricut, I used to buy custom shirts from my friend. Now that I have my own Cricut, I love making custom shirts for every holiday and event. It is super easy to customize designs and color in Cricut Design Space.
Christmas Shirts For Family
This original design had brown for Rudolf, but I don’t have brown vinyl nor am I interested in putting brown vinyl on my shirts. Instead I changed the colors to fit what I had on hand. I think the colors look fantastic together.
Measure Shirt First
Take the shirt and measure the space to determine how large you want the words to be. I always keep a small measuring tape in my Cricut.
Cricut Design Space
Open the Cricut Design Space on your computer. You can do this from your phone and tablet too.
Add a text box to a new project or you can choose an image design like we did for these shirts. There are some of the awesome pre-made Christmas designs that go great on holiday shirts. Actually, there are ton of free one too.
Size the Cricut Design based on the measurements you took of the shirts .
You can merge or change the colors of the Design using color sync on the right side of Cricut Design Space.
Now, hit MAKE it in green in the upper right corner.
Ironing On BOTH Sparkle Vinyl & Everyday Vinyl
To use Cricut Holographic Sparkle iron on vinyl, you should use the green circuit sheet with the standard stickiness.
Place the Holographic Sparkle vinyl shiny side down on the green standard grip Cricut mat. Make sure it is secure and try to avoid bubbles.
Load the green sheet with the sparkle holographic vinyl on it using the arrows and make sure the Cricut pulls it in properly.
On the computer, choose the machine and make sure that you are reversing the image.
Also, choose the type of Cricut Sparkle Holographic iron-on vinyl by selecting from the Cricut database of material. There are so many – make sure you get the right one.
Ensure that the Cricut has space behind and in front so it can work properly.
When the C – Cricut symbol is flashing, press it and watch the Cricut cut the letters.
Remove the sheet with the arrows.
Pull off the Vinyl and cut the space where the letters are.
Remove everything except the letters from the sheet using the weeding tools.
How to Print Using Cricut Everyday Iron On Vinyl?
To use Cricut Everyday iron on vinyl, you should use the green circuit sheet with the standard stickiness.
Place the Everyday vinyl shiny side down on the green standard grip Cricut mat. Make sure it is secure and try to avoid bubbles.
Load the green sheet with the Everyday vinyl on it using the arrows and make sure the Cricut pulls it in properly.
On the computer, choose the machine and make sure that you are reversing the image.
Also, choose the type of Cricut Everyday iron-on vinyl by selecting from the Cricut database of material. There are so many – make sure you get the right one.
Ensure that the Cricut has space behind and in front so it can work properly.
When the C – Cricut symbol is flashing, press it and watch the Cricut cut the letters.
Remove the sheet with the arrows.
Pull off the Everyday Vinyl and cut the space where the letters are.
Remove everything except the letters from the sheet using the weeding tools.
Pressing Cricut Sparkle Holographic Iron On AND Cricut Everyday Vinyl
Start pressing the Cricut Sparkle Holographic Iron On Vinyl first since the Easy Press 2 needs to be hotter for it to adhere. You don’t want to burn the Everyday Vinyl. You will lower the temperature when you use the Everyday Iron-On Vinyl.
Turn on the Cricut Easy Press 2 and make sure the timer is set to 30 seconds for 330 degrees F for Holographic Sparkle Vinyl.
Lay the shirt bag on the Easy Press Mat on top of a flat surface like a table. Let the Easy Press 2 heat up while you prep the shirt.
Heat up the area for 5 seconds where you will adding the Design. Place the whole design to get the spacing. Remove all the Everyday Vinyl pieces and leave only the Cricut Sparkle Holographic Iron On.
Place the Easy Press 2 on top of the Holographic Vinyl and let it is sit while you hold the machine for 30 seconds.
Remove the Easy Press 2 and put it back on the cradle. Now, cool down the Cricut Easy Press 2 to 315 degrees F. Add the Everyday Vinyl designs and place the Easy Press 2 on top of the Everyday Vinyl and let it is sit while you hold the machine for 30 seconds. Slowly remove liner while warm not cool.
What Cricut projects are you doing for gifts? I have a list that I am planning for the next few weeks. Stay tuned!

Christmas Shirts For Family
Make these Christmas Shirts for Family for holiday play dates and the many lounging days at home and the park during Christmas break.
Materials
- Cricut
- Standard Grip Mat
- Acrylic Ruler
- Cricut Easy Press 2
- Cricut Easy Press Mat
- Weeding Tools
Tools
- Cricut Holographic Sparkle Iron On Vinyl
- Everyday Iron On Vinyl
- T-Shirt
Instructions
Take the shirt and measure the space to determine how large you want the words to be.
Open the Cricut Design Space on your computer. You can do this from your phone and tablet too.
Add a text box to a new project or you can choose an image design like we did for these shirts. Here are some of the awesome pre-made Christmas designs that go great on holiday shirts.
Size the Cricut Design based on the measurements you took of the shirts .
You can merge or change the colors of the Design using color sync on the right side of Cricut Design Space.
Now, hit MAKE it in green in the upper right corner.
To use Cricut Holographic Sparkle iron on vinyl, you should use the green circuit sheet with the standard stickiness.
Place the Holographic Sparkle vinyl shiny side down on the green standard grip Cricut mat. Make sure it is secure and try to avoid bubbles.
Load the green sheet with the sparkle holographic vinyl on it using the arrows and make sure the Cricut pulls it in properly.
On the computer, choose the machine and make sure that you are reversing the image.
Also, choose the type of Cricut Sparkle Holographic iron-on vinyl by selecting from the Cricut database of material. There are so many – make sure you get the right one.
Ensure that the Cricut has space behind and in front so it can work properly.
When the C – Cricut symbol is flashing, press it and watch the Cricut cut the letters.
Remove the mat with the arrows.
Pull off the Vinyl and cut the space where the letters are.
Remove everything except the letters from the sheet using the weeding tools.
To use Cricut Everyday iron on vinyl, you should use the green circuit sheet with the standard stickiness.
Place the Everyday vinyl shiny side down on the green standard grip Cricut mat. Make sure it is secure and try to avoid bubbles.
Load the green sheet with the Everyday vinyl on it using the arrows and make sure the Cricut pulls it in properly.
On the computer, choose the machine and make sure that you are reversing the image.
Also, choose the type of Cricut Everyday iron-on vinyl by selecting from the Cricut database of material. There are so many – make sure you get the right one.
Ensure that the Cricut has space behind and in front so it can work properly.
When the C – Cricut symbol is flashing, press it and watch the Cricut cut the letters.
Remove the sheet with the arrows.
Pull off the Everyday Vinyl and cut the space where the letters are.
Remove everything except the letters from the sheet using the weeding tools.
Start pressing the Cricut Sparkle Holographic Iron On Vinyl first since the Easy Press 2 needs to be hotter for it to adhere. You don’t want to burn the Everyday Vinyl. You will lower the temperature when you use the Everyday Iron-On Vinyl.
Turn on the Cricut Easy Press 2 and make sure the timer is set to 30 seconds for 330 degrees F for Holographic Sparkle Vinyl.
Lay the shirt bag on the Easy Press Mat on top of a flat surface like a table.
Let the Easy Press 2 heat up while you prep the shirt.
Heat up the area for 5 seconds where you will adding the Design. Place the whole design to get the spacing.
Remove all the Everyday Vinyl pieces and leave only the Cricut Sparkle Holographic Iron On.
Place the Easy Press 2 on top of the Holographic Vinyl and let it is sit while you hold the machine for 30 seconds.
Remove the Easy Press 2 and put it back on the cradle.
Now, cool down the Cricut Easy Press 2 to 315 degrees F.
Add the Everyday Vinyl designs and place the Easy Press 2 on top of the Everyday Vinyl and let it is sit while you hold the machine for 30 seconds.
More Cricut Projects
If you love this Kid’s Colored Christmas Ornament, you will love these other Cricut Infusible Ink Projects.
More Cricut Projects
If you love this Kid’s Colored Christmas Ornament, you will love these other Cricut Infusible Ink Projects.
These Christmas shirts sound like a fun way to get the whole family into the holiday spirit. I love dressing up together for festivities. Do you have any favorite designs in the collection? It’s nice to see options that fit everyone.