Make these super fun Kid’s Colored Christmas Ornament with your Cricut and Infusible Ink Pens and Marker as well as Cricut Blanks Coaster.

You can get the whole family involved in the fun of creating these custom Christmas Ornament.
Kid’s Colored Christmas Ornament
These Kid’s Colored Christmas Ornament make great Christmas gifts for grandparents. All you have to do is enlist you kids to help you color in the Cricut draw images. The imperfections are endearing and welcomed in this project.
You start the project by To make these super fun Christmas Coasters, you will need your Cricut and an Easy Press 2 or an Iron and a heat proof mat or an ironing board. We have the Cricut Maker, but you can also make this project on the Cricut machines.
Start with a design you like in Cricut Design Space and see if you can convert it to a draw file that works. I changed a few cut files that I like and some that I have used before for shirt into draw files using the drop down menu.

Coloring Christmas Ornaments with the Kids
Once it is converted, you will need to merge the colors of the files so that they are all the same color. This makes the draw file more like a coloring page for these coloring coasters.
The Cricut Infusible Ink Pens allows you to draw your own creations to infuse on to the Cricut blanks coasters. You can also use the Cricut Infusible Ink Pens and markers to draw a file from Cricut Design Space. It is pretty amazing when you think about it.
Once you have the image drawn for infusible pens on cardstock, you want to color in the design with the Cricut Infusible Markers. This is where you enlist the kids to help you color in the Cricut drawn designs.
For the infusing part of the Cricut project, I would wait until the kids go to bed because you will need extremely high heat of 400 degrees F.
We have and love the Cricut Easy Press 2 and an Easy Press Mat that makes doing these projects so much easier than trying to pull it off with an iron.
To make the infusible ink work, you will need butcher paper to go between the infusible ink design and the Easy Press 2.
Some of it comes in the infusible ink transfer sheets, but not with the makers. I save scraps of the butcher paper for the infusible coaster projects. If you don’t have butcher paper, you can use copy paper.
How to Make Hand Colored Ornaments?
Size your draw image based on the coaster size and make them smaller than the available space. The Cricut Infusible Ink Blanks Coasters come in square and round. The round blanks coasters are 3.6 in diameter.
Here is another project using the round coasters and one with the square coasters. Load the .4 black infusible ink pen into the Cricut Machine.Lay the card stock on a light grib mat. Next, load the card stock into the machine using the arrow button.
The Cricut Machine will draw the design. Make sure to reverse the project if you are printing word in the Cricut Design Space printing area. Then, color in the designs in using the Cricut Infusible Ink Markers.
Next, we cut out the designs so that they would fit on to the coasters. Make sure to cut off any parts of the paper that have stay marks from the pens on them. They will also transfer with the design. I made this mistake a few times.
How to Easy Press 2 to Make Kid’s Colored Christmas Ornament?
Now, you will need Cricut blanks coasters, Cricut Easy Press 2, Easy Press mat, butcher paper, heat resistant tape, and the colored card stock.Start heating the Easy Press 2 to 400 degrees F for 60 seconds.
Lay out the Cricut blanks coasters onto the Easy Press mat. The Cricut blanks are a must for this project as the infusible ink does not show up as well on other shirts. Buying Cricut Blanks ensures infusible ink compatibility.
Use a lint brush to go over the coaster to ensure the design will stick properly. Set the design on to coaster where you want it with the print facing down on top of the coaster.Use heat resistant tape to keep the design in place.Put the butcher paper on top of the design.
Next, put the Easy Press 2 on top of the butcher paper with light pressure for 60 seconds. Do NOT move the Easy Press 2 as it will mess up the design.
Remove the Easy Press 2 and let the coaster cool fully before removing the design or moving in any way. You can still mess up the design.
Then, peel away the tape and pull up the design to reveal the vibrant colors of the infused ink! Repeat steps for the rest of the drawn designs.

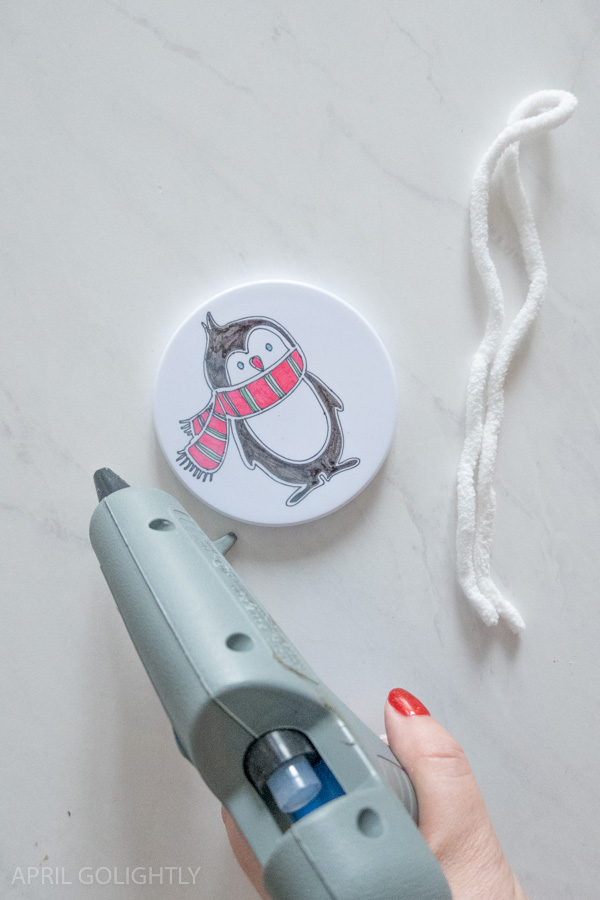
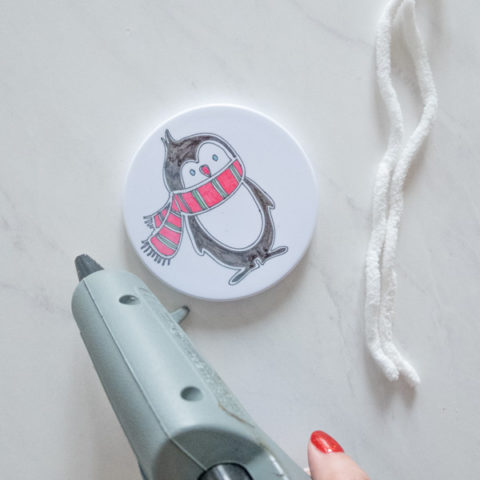
How to Make a Coaster into an Ornament?
To turn the coaster into a Christmas ornament, cut a 4 inch length of ribbon or yarn.

Fold the ribbon in half and tie it in a knot. Add a dot of hot glue to the back of the coaster and glued the ribbon or yarn on.

Add glue to the back of the yarn or ribbon to seal it in.

Let the glue dry for 24 hours before hanging.

Then, you are ready to pack up your ornaments for gift or put them straight on your Christmas tree.
Infusible Ink Ornaments
Make these super fun Kid's Colored Christmas Ornament with your Cricut and Infusible Ink Pens and Marker as well as Cricut Blanks Coaster.
Materials
- Cricut Infusible Ink Blanks Coasters
- Basic White Card Stock
- Cricut Infusible Ink Pens
- Butcher Paper
- Cricut Infusible Ink Markers
- Heat Resistant Tape
- Yarn or Ribbon
- Hot Glue
Tools
- Cricut
- Easy Press Mat
- Cricut Easypress 2
- Lint Brush
- Light Grip Mat
- Glue Gun
- Scissors
Instructions
Choose the images you want to put on the ornaments.
Change it to a draw file.
Then, size your draw image based on the coaster size and make them smaller than the available space. The round blanks coasters are 3.6 in diameter.
Load the .4 black infusible ink pen into the Cricut Machine.
Lay the card stock on a light grib mat.
Next, load the card stock into the machine using the arrows.
The Cricut Machine will draw the design. Make sure to reverse the project if you are printing word in the Cricut Design Space printing area.
Then, color in the designs in using the Cricut Infusible Ink Markers.
Next, we cut out the designs so that they would fit on to the coasters.
Now, you will need Cricut blanks coasters, Cricut Easy Press 2, Easy Press mat, butcher paper, heat resistant tape, and the colored card stock.
Start heating the Easy Press 2 to 400 degrees F for 60 seconds.
Lay out the Cricut blanks coasters onto the Easy Press mat. The Cricut blanks are a must for this project as the infusible ink does not show up as well on other shirts. Buying Cricut Blanks ensures infusible ink compatibility.
Use a lint brush to go over the coaster to ensure the design will stick properly.
Set the design on to coaster where you want it with the print facing down on top of the coaster.
Use heat resistant tape to keep the design in place.
Put the butcher paper on top of the design.
Next, put the Easy Press 2 on top of the butcher paper with light pressure for 60 seconds.
Do NOT move the Easy Press 2 as it will mess up the design.
Remove the Easy Press 2 and let the coaster cool fully before removing the design or moving in any way. You can still mess up the design.
Then, peel away the tape and pull up the design to reveal the vibrant colors of the infused ink!
Repeat steps for the rest of the drawn designs.
To turn the coaster into a Christmas ornament, cut a 4 inch length of ribbon or yarn.
Fold the ribbon in half and tie it in a knot.
Add a dot of hot glue to the back of the coaster and glued the ribbon or yarn on.
Add glue to the back of the yarn or ribbon to seal it in.
Let the glue dry for 24 hours before hanging.
Then, you are ready to pack up your ornaments for gift or put them straight on your Christmas tree.
More Infusible Ink Cricut Projects
If you love this Kid’s Colored Christmas Ornament, you will love these other Cricut Infusible Ink Projects.
Your point of view caught my eye and was very interesting. Thanks. I have a question for you.
I don’t think the title of your article matches the content lol. Just kidding, mainly because I had some doubts after reading the article.
Thank you for your sharing. I am worried that I lack creative ideas. It is your article that makes me full of hope. Thank you. But, I have a question, can you help me?
Thank you very much for sharing, I learned a lot from your article. Very cool. Thanks.
Thank you very much for sharing, I learned a lot from your article. Very cool. Thanks.
Thanks for sharing. I read many of your blog posts, cool, your blog is very good.
Thank you for your sharing. I am worried that I lack creative ideas. It is your article that makes me full of hope. Thank you. But, I have a question, can you help me?
Can you be more specific about the content of your article? After reading it, I still have some doubts. Hope you can help me.
Can you be more specific about the content of your article? After reading it, I still have some doubts. Hope you can help me.
Thank you for your sharing. I am worried that I lack creative ideas. It is your article that makes me full of hope. Thank you. But, I have a question, can you help me?
Thanks for sharing. I read many of your blog posts, cool, your blog is very good.
I love the idea of making colored Christmas ornaments with kids. It sounds like a fun way to spend time together and get creative. I remember making similar crafts when I was younger and still cherish those memories. Thanks for sharing this!